Showing posts with label bocage. Show all posts

Thursday, 29 August 2019

Holding the Line - a 6mm AAR

Tonight I took the rules A Sergeant's War for another spin, mainly to test out a few things, namely AT fire and HE fire.
The Scenario: A few squads of US infantry are holding a defensive line near a farm while an under-strength German platoon probes to test the viability of a larger counterattack in this area.

US forces: 2 BAR sections (4 men each), 1 30cal LMG (2 men), 2 rifle sections (5 men, one has a bazooka), 4 leaders, 1 57mm AT gun.
German forces: 2 LMGs (3 men each), 3 rifle squads (4 men each), 4 leaders, 1 StuG III.

The US defensive line. The 57mm gun covering the road with a BAR team holding the farm buildings. Their plan would be to fall back to the bocage lines held by their comrades should an attack of any note come. The right flank is being held by another BAR team while the rear is held by the 30 cal and the rifle squads. The Germans would be advancing in a general line.


 Jumping through the bocage a German rifle squad attracts some ineffective reactive fire from the BAR squad in the farm complex. Annoyingly this revealed their presence. Something I semi-ignored last game is spotting. But shooting basically gives the game away and by the opponent's next turn any enemy unit can shoot at you if they can get LOS. I think.


 Seeing a StuG III cautiously advance up the road the AT gun crew decide to engage. As the shot screams off it is clear it hits true as the StuG shudders...


 ...and begins to billow with smoke as rounds cook off inside. No crew make it out. I was almost disappointed that the first AT shot I have ever made with these rules hit and resulted in simple destruction. More likely would have been forcing morale checks from the crew.


 Seeing Germans in the open this rifle squad opens fire. The yellow is the hit die which was successful. The red die is the casualty roll, needing a 1 to cause a casualty, which they managed.

 The squad throw themselves to the ground, check on their dead comrade and wait for a chance to return fire. One hit and one casualty mean this squad performs 2 morale checks. Actually it is three because they are caught in the open. Their morale value is 4 so they need to roll 4+ on each die to avoid getting pinned. They actually failed two morale rolls, but the leader allowed them to re-roll one of them, which was a success. This squad cannot move, but can fire with a heavy penalty. However, before the Germans start moving and shooting, all German units who have pin markers can try and rally to remove one pin each.


 On the German left flank the MG34 team comes under fire from the defending BAR team, but the presence of their NCO helps steel them against getting pinned.


 Advancing up into the corner of the bocage a German rifle squad fires on the BAR team holding the farm house. Again, the presence of their NCO encourages them. I had many more successful Leaders leading this game, although I think there were a couple of times when they actually got killed and I forgot.


 At time goes on and it appears to be turning into a stalemate the BAR team on the US right flank looks like it might break, allowing the Germans to roll up the flank.


 Taking a chance the 57mm gun opens fire with HE against the MG team in the field to devastating effect. Under such fire and being in the open, not even the presence of their grizzled NCO can stop them breaking and seeking cover behind some bocage. A 57mm gun is a light HE gun, meaning it has FP2, so I roll 2 dice, needing 3+ to hit in this case. The hits plus being caught in the open led to 3 morale tests, all of which failed, and the NCO re-roll achieved nothing.


 Rifle fire sends the NCO scurrying off for cover also. I may have misunderstood the rules, but it doesn't seem you can kill leaders. They can only die while leading? I may be totally way off though.


 The already pinned down rifle squad takes more fire from the BAR team, becoming further pinned, but luckily avoiding becoming broken. Those German NCOs really know how to inspire their men!

That is until the 30 cal team opens up, breaking them, forcing them to retreat behind the bocage and off the battlefield. I read more about broken units. They keep retreating unless there are no enemy within LOS. So they kept retreating.


 On the US right flank the MG34 team comes under more fire.

 The BAR team on the right flank gets pinned again, but they keep rallying.


 The German squad firing up the road take some HE fire from the 57mm gun. They rally though and pass the morale tests.


 The MG34 team takes two casualties and becomes heavily pinned. They won't be doing much for a while. The unit is at less than 50% strength so the FP is halved. With 2 pins they cannot move or fire, but don't need to retreat.


After rallying some the MG34 team on the other side of the fight breaks again and retreats away. At this point the remaining German NCOs begin withdrawing their men. This may not be the right place to poke through the US defenses. 


This wasn't the best game in the world. I mainly wanted to experiment with AT and HE fire. I was thinking about having wave after wave of Germans coming, but decided it would get boring so kept to the first wave. The next game may be larger. I anxiously await my Heroics and Ros order with some Shermans and Stuarts. I want some actual allied armour.

Monday, 26 August 2019

A Sergeant's Normandy - 6mm AAR

Today was a momentous day. I finally took the plunge and used my 6mm WW2 armies for an actual game. The rules I used were A Sergeant's War, a set I have had for a couple of years now and have wanted to get to the table for a while. I am glad that this happened.

The scenario: An under-strength US platoon is tasked with shortening their defensive lines by advancing a few hundred metres to take possession of some nicely defensible farm buildings. However, these buildings fall within the firing sectors of an opposing under-strength German platoon. Chaos ensues. 

US Forces: 3 "leaders", 3 infantry sections of 5 men, 2 BAR sections of 4 men.

German Forces: 3 "leaders", 3 infantry sections of 4 men, 2 MG34 teams of 3 men.

After advancing unopposed a few hundred metres the US infantry find themselves close to the farm buildings. The final push may be where they finally face some resistance. 

An MG team and infantry squad hug the bocage waiting to ambush the advancing Americans.

Another MG team covers any approach to the barn.

A BAR team advances to the edge of cover and comes under ineffective defensive fire. The first shots have sounded. Defensive fire halves the number of D6 you can roll, thus halving the number of possible casualties, and decreasing how many pins you can inflict. 2 pins is pretty bad. 3 pins breaks the unit, forcing them to retreat some.

After a general advance, with the Americans hugging a line of bocage, the Germans advance slightly, to hug their bocage line also. 

A rifle squad had trouble crossing the bocage and found itself out in the open. This time, when the German MG team open fire it was much more effective causing the unit to become pinned, but not inflicting any casualties. For each hit you take, you roll for a casualty. Then, for every hit AND casualty, you roll a morale test. The more morale tests you fail, the more pinned you become. If you get caught in the open, you also take an extra morale test. Mini red dice are pin markers. The numbers on them are irrelevant. I just couldn't be bothered to dig out my little card markers from Starport Scum.

On the other flank the US rifle squads advance into the open field, hoping to rush across. One squad gets heavily pinned under furious rifle fire. This is where I discover that getting caught in the open is actually really bad. Two pins mean you can't move or shoot and can only attempt to rally, or react in a firefight (close quarters combat).

Now it is the American turn and the BAR squad advances and fires, pinning the German rifle squad. I may have played wrong, but I played that my squad took 2 pins, but then at the start of their turn they could rally and lose one, so having 2 pins actually meant nothing because no-one was left to fire at them. But now thinking about it I can see the purpose.


Lots of ineffective fire is exchanged across the bocage, while one US rifle squad holds one of the farm buildings. I said that as soon as the US held both buildings I would give Jerry 2 turns to root them out.

The Germans lay down plenty of poorly aimed fire on the right flank causing little more damage than some scared rabbits and a few broken twigs.


On the left flank, however, the BAR team and the rifle squad both become pinned. It turned out that in this game, even having only 1 pin marker made you pretty much useless. All units needed a 3+ to hit, but had a penalty of -2 for being pinned and -1 because most units had cover, so I needed 6 to hit which almost never happened.


After rallying the BAR team on the left flank double pinned the MG team. This was a good win, essentially buying them some time to advance. The leader failed to succeed in the re-roll of a morale test. The BAR team scored 2 hits. It then rolled 2 casualty checks, but because they didn't roll a 1, none were inflicted. As such, because there were only 2 hits and no casualties, the MG team had to roll 2 morale checks, both failed. The leader nearby allowed them to re-roll one, but they rolled a 2, which failed. Rolling a 1, would have gotten the leader killed, which is the risk of using them. An interesting mechanic.


The right flank BAR team also managed to heavily suppress the German rifle team with withering fire. In this game I completely forgot that US infantry, armed with the M1 Garand get a free second suppressing attack that cannot cause casualties, but can cause more pinning. 


As a response the MG team and rifles opposing the US advance lay down some serious fire, heavily suppressing the GIs and even causing a casualty.


With the left flank heavily suppressed the NCO tries to help rally his men, only to get himself killed. At the start of each round every unit can attempt to rally to remove a pinned marker. If you fail this, your leader can allow you to re-roll, but on a roll of 1, he dies. 


Sick of all this sitting around, the right flank advance into ineffective fire. 


The US rifle squad holding the farm complex also advance slightly to help lay fire down on the German defenders. This is lucky as they manage to heavily suppress them.


Back on the left the US rifle squad charges in to engage in a firefight (close quarters fighting) with a German squad. This was mainly for me to experiment with firefights. I love them.


With devastating effect the GIs unload their weapons across the bocage, inflicting some casualties and forcing the Germans to retreat, broken. Luckily the nearby German unit remained resolute to fight on. The Americans soundly won the firefight. Casualties were lighter than I would have thought. The "spreading panic" thing was interesting, but it had no impact. White die represents broken.


In the centre the BAR team and rifle squad open up on a German rifle team and inflict a casualty while also causing the unit to break. 3 pins means broken. No moving, no firing. Retreat a full move away. Can only hope to rally in next turn.


The BAR team on the left flank advances up to the barn and opens fire on one of the MG teams, pinning it. Unable to do much by way of fighting, and unlikely to retake the farm buildings soon, the Germans call it a day and begin a withdrawal.


It got a bit boring in the middle where people just seemed to be lobbing fire across at each other to little or no effect. Otherwise I enjoyed the game and look forward to trying out some more. 


Saturday, 20 July 2019

6mm Bocage - my best yet

I have finally gotten a recipe for 6mm bocage that pleases me. Stolen shamelessly from Derek's wee toys blog, it has given me the desire and momentum to get my 6mm WW2 stuff going again. The momentum is also coming from my re-reading of the ruleset "A Sergeant's War" by Nathaniel Weber.  It is doable on small tables, and with relatively little in terms of fancy terrain. I like the idea of being able to have small, quick battles with my 3,2,1 based infantry. 

Anyway, these bocage pieces look good and are fairly simple and cheap to make. The problem I have is that you can see the hot glue in some parts. I also am not a huge fan of the static grass no the banks, so might need to experiment with some flock that looks less cartoony, like the unfortunate flock on my US infantry and the vehicles. 


So I have 8 jumbo lollystick lengths of bocage. I need to have a huge amount more than this, so this will likely end up being my project for the summer holidays.


Sunday, 7 October 2018

Normandy Progress: A closer look at the hedges.


I brought my felt mat back from school to see how the hedges and roads look on a green backdrop. My kain take away from this is that I really don't like the felt mat. It is too uniform. I much prefer the Lidl mats I bought this summer. I also need more by way of fields and things to break up the green.


A German ambush lies in wait. I mean it looks fine, but the road is curling up which annoys me. I have found other methods for road creation, so hopefully I can experiment with those soon.


The GIs advance. Hoping to hold the road junction. It all feels very cramped. Not sure how happy I am with that. I feel very much like "that'll do" but want more. I want to wow myself with my terrain making prowess. Back to the ideas phase I think for roads. Hedges I am pleased with. I just need more.


Thursday, 4 October 2018

More Hedges: Normandy Progress

I managed to complete some hedges for my WW2 project. The trees are from a different bag of trees, and are quite frankly hideous. The foliage is fine, and I applied it with neat PVA glue this time. I will see tonight how well it has solidified as it will have been left for 24 hours. 

As it stands though, I think they are promising. A good stop gap until I find a better method perhaps.


Wednesday, 5 September 2018

Roads and Bocage: Normandy Progress

Two terrain projects are about to finish. I am not sure how happy I am with both.

Bocage: 

I had made an experiment a couple of months ago by mixing foliage with PVA glue and squashing that onto lolly sticks. It looked okay, but my goodness it was difficult to paint the lolly sticks afterwards. Therefore, I gave up and began again.

The process: texture the lolly sticks. Paint them brown. Dry brush them. I then used green stuff to attach some trees to most of sticks. Some of the trees I trimmed down to be shorter. So far, so good. Simple, effective, nice looking. The next step was where the problems began.


 I needed to attach the foliage. To do this, I mixed PVA glue with water, then mixed the foliage in and began applying it to the lolly sticks. The picture below shows that they look good. However, it took multiple attempts to get the correct ratio of water to glue to make the foliage stick really solidly to the lolly sticks. As it happens the best ratio is: almost pure glue. 


Next up: roads.

Having read a few blog posts and websites it looked like you could make roads by using window frame sealant. If I used brown, then that would cut down one layer of paint as well! What could go wrong?

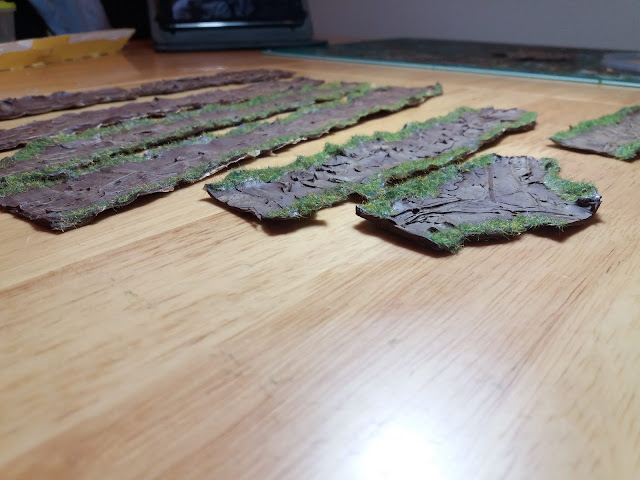
The tutorial said to use wax paper or grease proof paper, then create brown strips of window sealant. This means you can peel it off? Not sure. So that is what I did. It looks fine so far. I left it two days to properly dry...


I cut them off and tried to peel the paper off the back. It wouldn't all come off. It also became clear that the sealant had contracted and curled inwards. I was worried it would be problematic and the roads wouldn't lie flat.


I was right. They curl a little. I am not sure how I feel about that. My next batch I will initially make on a glass pane...see if that stops it shrinking in on itself and curling up.


Luckily, once drybrushed and flocked, they don't look too bad.


And when placed with bocage, it doesn't matter too much. The main job will now to be to create more bocage and roads. I need feet and feet of them!!