Showing posts with label terrain. Show all posts

Saturday, 26 July 2025

20mm MDF ruins making progress

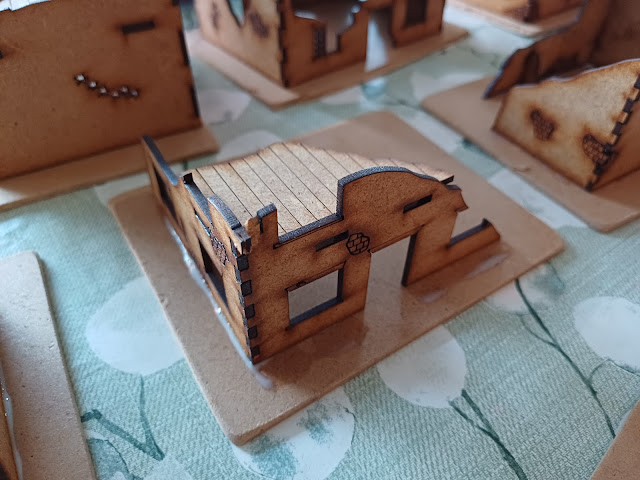
 Remember I bought these as a pack, along with an in-tact farm. Three of the buildings are pretty much four sided and are built as a damaged building. There is little to no customisation with them. The remaining ruins were a varied assortment of corner sections. A while back I made a decision that I would base the ruins. More recently I decided I would try and sort some corner sections into parts of the same building. You will see three of my ruin sets have two parts to them. I think they are pretty effective. 

The bases are wooden. They have come from the back of a mirror or a photo frame. I can't remember, but I saw it and rescued it from the bin. It has been in my cupboard for a year? Today I measured it up and wasted a lot of time sawing it to pieces. I started with the saw of my swiss army knife. I continued with a foldable garden saw meant for branches. In the end though I realised that if I scored the same area with a Stanley knife a few times, I was able to just snap the wood. Much quicker. But hey, we live and learn. 


I am not permanently attaching the three "complete" buildings to their bases. I have a feeling there might come a time when I would rather they be un-based. This may never happen and I might change my mind. Only time will tell. The remaining ruin sets will be generously covered in rubble and painted up. 


I sanded the edges and rounded the corners to make them less harsh. You can see that I labeled the ruins and the ruin bases so I wouldn't get confused later. 


This ruin is just a corner piece. I quite like it on its own though.


The thought of basing/storing tiny corner pieces like above was part of what made me think I will base them together as the same buildings. 


This is just the one building piece. I will put a lot of rubble around the edge and perhaps build up remains of a wall.


This one is tall. I like that. Once I have completed these I will need to get in the attic and dig out my other corner ruins from that Kickstarter many, many years ago. Been sitting in a box since 2013 probably. I reckon I put them together once or twice but have never, ever used them. After all, I switched pretty convincingly over to 6mm in 2016 I would say and haven't really looked back. 

Thursday, 5 June 2025

MDF Ruins

 As previously mentioned I bought a Normandy farm in MDF. I also bought a pack of assorted ruins. This week I put them together. I am over all pretty pleased. You can see from below that some of them are literally a corner of a building. I will base those on a rough shape and add more rubble when the time comes. I mean they are pretty simple, I wasn't expecting much. I have other corner parts of buildings that are better - things I bought ages ago but have lived, unbuilt in a box since 2013. 


Below is some kind of workshop. It has doors for the front that I will put on at some point. I quite like it. Again, it will end up on a little base with some rubble. I am trying to work out how to make a tub of rubble that I can just pour onto the table when and where I need it. I have seen stuff you can buy but feel that is a waste. I have cat litter somewhere...


The frustrating thing about the below ruin is that the two walls don't fit together. Look, the longer wall extends out beyond where is should go. This complaint is minor. But it really does annoy me. 


Below looks like it is meant to be a flat topped building. I will probably just use it anyway in Normandy.


Below is one step up from a corner ruin. It reminds me a little of the Airfix Forward Command Post kit (which I have). I should dig that out and improve it. I built up a  bank around it to create a courtyard type area. I might add some bocage or something to it. This building will just go on as small a footprint as possible. 


What you can't see is the one ruin section where the first storey floor doesn't fit into the slots. It is frustrating because it is one of the coolest looking ruined sections. I will see what I can do with it, I might just leave the floor out of it. 

For the cost, these are a high recommend from me. They will certainly do the job I need them to do. 

Sunday, 10 April 2022

New terrain features to get going.

Last night I had a session. I worked on my forest stands, all they really need is some flocking, and maybe some different highlights on the trees. 

I also put together two small CD based scenes. One is another backwater landing pad. The other is a colonial administration building, the biggest one that can sit in the centre of town. I wanted it on a larger base than the other Iliada buildings, in order to create more of a vignete with it. 


Soviet ATG for scale.


Barely visible there are cables connecting the buildings together. These are those wires used to keep toys in place in their packaging. I have loads of them and it is nice to get them used.


Saturday, 2 April 2022

Iliada Studios buildings and other terrain

Another couple of projects that I managed to finish tonight. I found myself with the opportunity to have two sessions this weekend where I will have something to watch and listen to that doesn't require much attention. This is perfect for hobby time. Tonight has been good, although with my middle deciding to test positive for COVID today, tomorrow's time might be taken up with unfortunate prep-work for covering my job on Monday. 


Something dodgy going on. Cultists? Black market exchange? Unsure. But this ancient stone ring likely had some local significance before humanity found this place.


A few more buildings with which to build a bustling interstellar settlement.


I really like these. I have a couple of other things on the bench that I hope to get finished soon. Easter is in a week and I intend to get plenty of things finished during that two week break.

Tonight I also added clump foliage to my latest batch of tree stands. They look okay but I will leave them overnight to dry. I also based up and textured the bases of another squad of Soviet infantry and a bunch of vehicles. 

Tuesday, 22 February 2022

Cheap junk buildings.

 So as part of building sci fi buildings, I am always on the lookout for cheap things to use. Here is something I have come up with.


I don't know what these are. I bought a bag of them from B&Q. At the top you have the thing that looks like a complete building. The bottom are ones that look like they could be a gate in a wall or something. Also visible are the flat bits that can clip into the underside of the gate type thing.


Above are a couple that I have covered. One is green stuff, one is wall filler. I have scored them in an attempt to make very basic, jungle, Vietnam, Pacific island sort of dwellings. They have been sitting unfinished like this for ages. I feel like with a little paint, they might be successful.


Here I have clipped the flat bit into two of them, then stuck them together. I covered the gaps with paper and am happy with how this looks. To be painted soon.


Here I have simply painted and dry-brushed them. They are serviceable. 


Top centre you can see three of them. I filled the holes, and stuck a chimney in them. I like them. These just seem to be simple, effective methods of creating buildings. I wish I could tell you what they actually are, but there were 100% a "oh this looks like it could be a house" then toss into the trolley situation at B&Q. 
I hope you are inspired.


Saturday, 12 February 2022

On Trees, and how to make them slightly less awful.

Trees. I hate trees. Luckily in 6mm there is a large array of cheap trees on eBay, but they aren't actually great on their own. They are shiny, the leaves fall off, and they are all perfectly shaped. I have been trying to figure this out for a while, and so here we go: Here is my tutorial for making stands of trees. 

1. Drill holes in MDF bases. I bought a huge box of bases on eBay that was like 1.9kg of assorted bases for £x. I can't remember. Maybe £10 or £20. The holes are the same width as the trunk of the cheap eBay trees from China. I did stands of 1, 2, and 5 trees for this experiment. 

2. Insert trees and attach with PVA glue. White glue? Elmers glue?

3. Texture the bases with my Vallejo texture paste. But insert your method of texturing here. My paste costs just under £10. This is my second tub since I started using it in 2016 or something. 

4. Messy part. I glued assorted bits of clump foliage to the tops of the trees. I watered down the PVA and just sort of went for it. My hands got messy and I found the most efficient way was to just drop clumps of foliage into the watered down glue, then scoop them out and press them onto the balding trees. You can see below that they are no longer perfectly uniform spheres. At this point I wanted to stop, but I figured the foliage would fall off at points and I should do my best to seal it on. I decided to carry on with two stand of trees to see if the rest of the method would work, and was happy with the result so went for it with all of them.


5. I sprayed the stands with a colour called Russett Brown. The can is from The Range and cost £6.99 probably. It is shiny, probably described as a satin sheen. At this point I got worried. I have had poor experience with this spray before and my memories came flooding back. 


6. I then sprayed them again with a green colour. Same place, same cost. You could see the darker brown colour underneath in places, which I liked. It would stop them being too monochromatic. Still too shiny though.


7. Paint the trunks with Vallejo Beige Brown. This is my go to wood colour. Rifle stocks, stacks of logs, fences, tree trunks. I gave them a heavy dry brush with a Citadel green that is so light it is almost yellow. The paint is in the other room though and I don't want to get up. At this point my fears started to dispell. I had a slight worry that they will all look a little too uniform in terms of colour, but shape is good. Also worth noting in some places you can still see the awful plastic green of the original leaves, but they tend to be on the underside, where I can't see it from wargaming height, so I ignored it.


8. Standard base colour. This was from The Works years ago and is still going strong. I use it exclusively for painting bases. I once used it to drybrush some T-34s and it was too shiny. 


9. Standard basing. I wash them with Cidadel Agrax Earthshade. This might be the most expensive part? Like I use this shade a lot, on all of my bases, and the little tub costs like a Fiver. At this point I breathed a sigh of relief. This is also the longest drying part. 

10. I painted the edges of the bases with some brown colour. I think it was Vallejo German Camo Brown. This is just to neaten it up. I could have gone a green, and maybe I should have.


11. Static grass in a few places (not too close to the trees, as grass struggles to grow around trees), and some blobs of clump foliage, this time that will stay as is. I then seal it all with a matt lacquer spray which got rid of any residual shine from the first layers of spray paint. Here they are in their woods. 


The next time I make tree stands I will likely try a few different shades of green, which will help my woods look a little less samey. All in all though, I am really pleased with them. If anything I am just annoyed that it has taken me nearly 10 years to be bothered to try something like this. 

Sunday, 19 December 2021

Welcome to Back Water outpost.

 A tiny outpost. An unregistered freighter. This can only mean hijinks are afoot. I finally flocked and did some drybrushing on this. I have been dormant in this hobby while the building work has been going on. It is now the Christmas break and I intend to spend a few evenings and early mornings doing some painting and building. I have quite a backlog to clear of half finished stuff. 


New work laptop. I can't seem to edit photos on it, and I refuse to boot up my personal laptop which will take 40 minutes to load, then crash. 


Wednesday, 15 September 2021

Hills with Expandable Foam

 Morning all. I had a failed experiment with expandable foam hills a while back. I tried again over this summer and here is the only so far finished hill. 


In general I am happy with it. It looks pretty good. I shaved off most of the exterior edges and covered it with sand. Then painted brown, dry brushed light, then flocked. However, issues arise in other images. 


Underneath you can see where there is no sand. It looks quite smooth. I don't think that is a huge problem though. But it does look a little funky. 
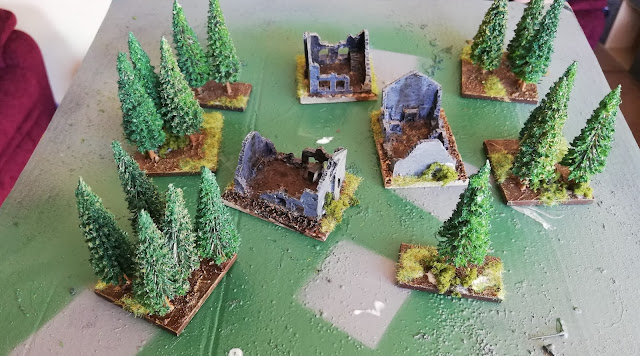
I don't like that it doesn't sit flush on the table either. My other, unfinished hills have been chopped across the middle and hopefully sit more flat. I might add a small base to each hill. But that might be more effort than it is worth. 


Sunday, 28 February 2021

Forest stands for the Ardennes - Finished.

 Here is my walkthrough on how to make these stands. 


Back in August 2012 I visited my brother who lives in the USA. The point was to see him and also go to Gencon. While there he got me interested in DnD and Pathfinder, and showed me how he had recently begun vaguely painting miniatures again since neither of us had done it in years. I decided to get painting miniatures again and committed myself to basing up infantry figures to play Crossfire, the WW2 wargame with no measuring. As such, I bought a box full of these MDF squares and rectangles. I based up three squads of 20mm Skytrex British Infantry and that was the end of that journey. I have yet to play those rules, and the infantry have since been removed from the bases. These squares have just sat in a box for nine years, with me occasionally dipping in to base crewed weapons. 

Now is their moment to shine. I drilled holes in, after measuring the width of the drill bit. The trees are all cheap Chinese trees and are pretty awful. I used a proper electric drill as my craft drill is dreadful.


I then glued the trees into the holes. Some of them needed me to chop the trunk a bit as it was pointed and wouldn't have stayed upright.


I then textured the bases with my Vallejo earth texture paste. After this dried I brushed PVA glue onto the trees and dipped them into a tub of their own fallen off leaves. Then they were primed with a green primer, which darkened them, but is a bit shiny. I might have not shaken it up enough. Generic brown craft paint applied to the bases. Also a few trees have been drybrushed with a lighter green. I disliked how uniform they were. They are still kind of uniform, but at a later date I might go over some of them again.


Heavy drybrush of sand colour on the bases, then some static grass and clump foliage and hey presto - I have some finished fir tree stands. I also ordered a pack that was sold as "1.6kg of MDF bases of various shapes and sizes". I will be using this to make more stands on rounder bases. Overall I am happy with how they turned out and will be happier with the future, more circular stands that I will be making. 


Wednesday, 27 January 2021

Junk Build Flying Machine 4.0

 So for a couple of weeks now, my children have had the Lego down in the lounge, and have set up a little town on the all-purpose table. Every evening I decide the effort of moving the Lego is not out-weighed by my desire to paint/build. Last night, however the Lego was gone. So it was hobby o'clock. 

I didn't want to actually paint, and have a collection of junk that I have been eying up as possible spacecraft for a while now, so decided to go for it. 


This is some sort of glasses cleaner with the spongey cleaning pads removed. I had to cut the brush off, which extends out of the rear and stick some greeblies on. There are small paper squares to give it the panelled look, and a few other bits. The fin out of the back was a last minute addition, which I am not sure about. I think it gives this more of an atmospheric flyer look, rather than a space faring craft. The long protuberances are for carrying large, heavy-duty cargo.


This is going to be some sort of landing/unloading bay. My new junk-build fits on it. I again just wanted a rough looking, industrial/frontier looking sort of outpost. 

Saturday, 8 August 2020

Iliada Game Studio order

I have been following Iliada Game Studios for a few years now, and one of my only regrets regarding my science fiction gaming is that I never ordered some of his original Mars miniatures, before he pioneered MDF miniatures. I don't know why I never pulled the trigger. For a while now I have been impressed with the laser-cut buildings, and now the Afterwinds setting. So, with birthday money in hand, I went online and put a tentative order in, expecting to be happy.

I was not disappointed.
I was unsure about the size of these, but they are cool. Annoyingly I tried straightening out a gun and snapped it. But I will just have a long barreled and short barreled gun.
This is how I expected it to be. Normal feeling MDF. I love the aesthetic, and am excited about having some oil drilling settlements.
I bought some doors and fans to add to buildings. I wanted the wind-turbine thing, and I wanted to try out a satellite uplink. They are so unbelievably thin. They terrify me!! However, online they look absolutely gorgeous. I might need to just think about how I store things now.

 This is the pack of "Mediterranean buildings". They will look good dotted around my galaxy. Again, very thin. But they look durable enough when built.

Ali kept me updated, and shipping was fast. It cost $15 to ship, which felt steep, but I didn't experiment to see when that $15 ticked higher. It might be more cost effective in the long run if I do larger orders.

Saturday, 18 July 2020

Terrain - Mechwreck

Here we go. It took days for the tissue to dry...I might need to work on my technique there. But finally this long forgotten mech is in a place I am happy to call table ready.

Here is a before shot:

Here are the after shots:
The rocks are these pink decorative, cat-litter looking things from IKEA that a colleague gave me to use for my wargaming. I have stuck other random bits of junk onto it, including a broken Lego brick and a tiddly-wink. 


Some scouts are investigating this ancient hulk, in awe of these mechanical beasts left over from a long forgotten war.