Showing posts with label trees. Show all posts

Sunday, 10 April 2022

New terrain features to get going.

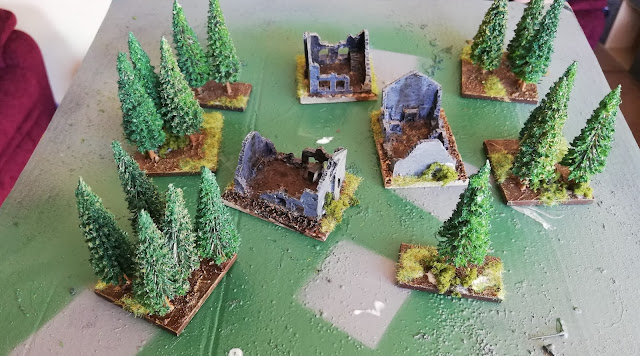
Last night I had a session. I worked on my forest stands, all they really need is some flocking, and maybe some different highlights on the trees. 

I also put together two small CD based scenes. One is another backwater landing pad. The other is a colonial administration building, the biggest one that can sit in the centre of town. I wanted it on a larger base than the other Iliada buildings, in order to create more of a vignete with it. 


Soviet ATG for scale.


Barely visible there are cables connecting the buildings together. These are those wires used to keep toys in place in their packaging. I have loads of them and it is nice to get them used.


Saturday, 12 February 2022

On Trees, and how to make them slightly less awful.

Trees. I hate trees. Luckily in 6mm there is a large array of cheap trees on eBay, but they aren't actually great on their own. They are shiny, the leaves fall off, and they are all perfectly shaped. I have been trying to figure this out for a while, and so here we go: Here is my tutorial for making stands of trees. 

1. Drill holes in MDF bases. I bought a huge box of bases on eBay that was like 1.9kg of assorted bases for £x. I can't remember. Maybe £10 or £20. The holes are the same width as the trunk of the cheap eBay trees from China. I did stands of 1, 2, and 5 trees for this experiment. 

2. Insert trees and attach with PVA glue. White glue? Elmers glue?

3. Texture the bases with my Vallejo texture paste. But insert your method of texturing here. My paste costs just under £10. This is my second tub since I started using it in 2016 or something. 

4. Messy part. I glued assorted bits of clump foliage to the tops of the trees. I watered down the PVA and just sort of went for it. My hands got messy and I found the most efficient way was to just drop clumps of foliage into the watered down glue, then scoop them out and press them onto the balding trees. You can see below that they are no longer perfectly uniform spheres. At this point I wanted to stop, but I figured the foliage would fall off at points and I should do my best to seal it on. I decided to carry on with two stand of trees to see if the rest of the method would work, and was happy with the result so went for it with all of them.


5. I sprayed the stands with a colour called Russett Brown. The can is from The Range and cost £6.99 probably. It is shiny, probably described as a satin sheen. At this point I got worried. I have had poor experience with this spray before and my memories came flooding back. 


6. I then sprayed them again with a green colour. Same place, same cost. You could see the darker brown colour underneath in places, which I liked. It would stop them being too monochromatic. Still too shiny though.


7. Paint the trunks with Vallejo Beige Brown. This is my go to wood colour. Rifle stocks, stacks of logs, fences, tree trunks. I gave them a heavy dry brush with a Citadel green that is so light it is almost yellow. The paint is in the other room though and I don't want to get up. At this point my fears started to dispell. I had a slight worry that they will all look a little too uniform in terms of colour, but shape is good. Also worth noting in some places you can still see the awful plastic green of the original leaves, but they tend to be on the underside, where I can't see it from wargaming height, so I ignored it.


8. Standard base colour. This was from The Works years ago and is still going strong. I use it exclusively for painting bases. I once used it to drybrush some T-34s and it was too shiny. 


9. Standard basing. I wash them with Cidadel Agrax Earthshade. This might be the most expensive part? Like I use this shade a lot, on all of my bases, and the little tub costs like a Fiver. At this point I breathed a sigh of relief. This is also the longest drying part. 

10. I painted the edges of the bases with some brown colour. I think it was Vallejo German Camo Brown. This is just to neaten it up. I could have gone a green, and maybe I should have.


11. Static grass in a few places (not too close to the trees, as grass struggles to grow around trees), and some blobs of clump foliage, this time that will stay as is. I then seal it all with a matt lacquer spray which got rid of any residual shine from the first layers of spray paint. Here they are in their woods. 


The next time I make tree stands I will likely try a few different shades of green, which will help my woods look a little less samey. All in all though, I am really pleased with them. If anything I am just annoyed that it has taken me nearly 10 years to be bothered to try something like this. 

Saturday, 3 July 2021

Mag Train and fir trees for the Ardennes.

 The trees are for the Ardennes, not the mag train. Although it might have stolen artwork hidden on it...


The round stands are far, far superior to the previous square stands. I will keep the square ones until I have enough of these to make them unnecessary. 


The Angel Barracks/CP Models grav/mag train. I have had this lying around for ages and decided to paint it up. The track is unpainted card from the box of the boardgame Dominion. I have since sprayed it and will figure out how to paint it in due time.


Ready for some thrilling heroics.

Sunday, 28 February 2021

Forest stands for the Ardennes - Finished.

 Here is my walkthrough on how to make these stands. 


Back in August 2012 I visited my brother who lives in the USA. The point was to see him and also go to Gencon. While there he got me interested in DnD and Pathfinder, and showed me how he had recently begun vaguely painting miniatures again since neither of us had done it in years. I decided to get painting miniatures again and committed myself to basing up infantry figures to play Crossfire, the WW2 wargame with no measuring. As such, I bought a box full of these MDF squares and rectangles. I based up three squads of 20mm Skytrex British Infantry and that was the end of that journey. I have yet to play those rules, and the infantry have since been removed from the bases. These squares have just sat in a box for nine years, with me occasionally dipping in to base crewed weapons. 

Now is their moment to shine. I drilled holes in, after measuring the width of the drill bit. The trees are all cheap Chinese trees and are pretty awful. I used a proper electric drill as my craft drill is dreadful.


I then glued the trees into the holes. Some of them needed me to chop the trunk a bit as it was pointed and wouldn't have stayed upright.


I then textured the bases with my Vallejo earth texture paste. After this dried I brushed PVA glue onto the trees and dipped them into a tub of their own fallen off leaves. Then they were primed with a green primer, which darkened them, but is a bit shiny. I might have not shaken it up enough. Generic brown craft paint applied to the bases. Also a few trees have been drybrushed with a lighter green. I disliked how uniform they were. They are still kind of uniform, but at a later date I might go over some of them again.


Heavy drybrush of sand colour on the bases, then some static grass and clump foliage and hey presto - I have some finished fir tree stands. I also ordered a pack that was sold as "1.6kg of MDF bases of various shapes and sizes". I will be using this to make more stands on rounder bases. Overall I am happy with how they turned out and will be happier with the future, more circular stands that I will be making. 


Thursday, 4 October 2018

More Hedges: Normandy Progress

I managed to complete some hedges for my WW2 project. The trees are from a different bag of trees, and are quite frankly hideous. The foliage is fine, and I applied it with neat PVA glue this time. I will see tonight how well it has solidified as it will have been left for 24 hours. 

As it stands though, I think they are promising. A good stop gap until I find a better method perhaps.


Saturday, 26 May 2018

What's that coming over the hill?

Trained and equipped to fight in the jungles of the colonies of the struggling Western Alliance, the Green Jackets are hard as nails. Originally a small force of elite infantry, they have grown and are often involved in combined arms actions. These men and women took their name from an ancient unit of elite soldiers who fought for a country lost to the ages. 

The Western Alliance was once the superpower that succeeded in creating the largest interstellar empire centred around Old Earth. However, when the Collapse came they struggled to maintain their power, due to much of their economy relying on Old Earth economies. Then with the formation of the UCS, the Western Alliance found itself dwarfed and fighting just to survive.

If the Green Jackets have anything to say about it, then yes, yes it will.


Wednesday, 27 December 2017

Christmas progress.

My wife was lovely and bought me a south African army from Brigade models. I love the infantry with their hats and was excited about the rhino tanks which I have ummed and ahhed about for ages.

Last night I based a few and primed them this morning with the last of my white spray.

I also put the final dry brush highlights on my terrain.


Friday, 25 August 2017

Rocks and buildings.

I finished some more terrain today. Mainly I just tried to seal the flock with a matt spray, which seems to have only half worked.


These buildings are punted up Sky TV connectors or something. Looks like you plug a normal Ethernet cable into these then into the wall? Not sure, don't care. I stuck a door in and am proud of what they have become.


Saturday, 6 August 2016

Trees. Finally some trees.

One can tell from this flurry of activity that I have had a productive couple of days with the hobby. Today I am not feeling amazing and so my wife and daughter left to enjoy the sun, while I kept myself in close distance to...useful facilities.

I have been into models and wargaming for a long time. I am approaching the four year mark of this blog, with a slow increase in actually playing games. Yet I have never had trees. Never ever. They are either too expensive, too fragile or too messy to make. After years of reading, researching, trying to find the best recipe for making tree terrain, I ended up on Ebay buying some super cheap trees from China. How bad could they be? Right?

Bad. They were smaller than I imagined, and as soon as I pulled one out of the bag they began shedding. They really are awful. BUT: What should I expect for £2.47 or something for 40 odd trees?

I gathered my remaining CDs and some round MDF bases that have been lying around for 2 years (originally intended for WW2 cannon) and may aswell be used, grabbed some Green Stuff and got to work. My original plan for making removable trees failed. I settled with attaching them with the knowledge that these will need to be replaced at some point.

I also flocked my jungle stands and then sprayed the whole shebang with my Army Painter matt spray. Flock and leaves are secure. Vacuum packaging terrain not shiny anymore.